Hey there, tech enthusiasts! If you're reading this, chances are you're looking to take your Raspberry Pi game to the next level. Controlling your Raspberry Pi via web browser is not just a cool trick—it's a powerful way to manage your projects from anywhere in the world. Whether you're a seasoned pro or just getting started, this guide will walk you through everything you need to know. So buckle up, because we're about to dive deep into the world of remote Raspberry Pi control!
Picture this: you're on vacation, but you've got a Raspberry Pi project running at home. Wouldn't it be awesome if you could check in on it or even tweak some settings without being physically present? That's exactly what controlling your Raspberry Pi via web browser allows you to do. With just a few steps, you can turn your little Pi into a fully accessible remote server.
But why stop there? This setup isn't just for convenience—it's also a gateway to building more complex projects like home automation systems, remote monitoring tools, or even a personal cloud. So whether you're a hobbyist or a professional developer, learning how to control Raspberry Pi via web browser is a skill worth mastering.
Read also:Princess Eugenie Celebrates National Sibling Day With Heartfelt Message For Princess Beatrice
Why Control Raspberry Pi Via Web Browser?
Let's get real here. Why bother setting up your Raspberry Pi to be controlled via web browser when you could just use SSH or a direct connection? Well, for starters, web-based control gives you unparalleled flexibility. You don't need special software or tools—just a browser, and you're good to go. Plus, it's super easy to share access with others if needed.
Here are a few reasons why controlling Raspberry Pi via web browser is such a game-changer:
- Access your Pi from anywhere in the world using any device with a browser.
- No need for additional apps or software—just open a tab and go.
- Perfect for collaborative projects where multiple people need access.
- Great for beginners who might find SSH intimidating.
And let's not forget the cool factor. Imagine impressing your friends by controlling your smart home setup from your phone while sipping coffee at a café. Yeah, that's right—we're living in the future!
Setting Up Your Raspberry Pi for Web Control
Alright, let's get down to business. Setting up your Raspberry Pi for web-based control involves a few key steps. Don't worry—it's easier than it sounds. We'll break it down step by step so even if you're new to Raspberry Pi, you'll be able to follow along.
Step 1: Install Raspbian OS
First things first, make sure your Raspberry Pi is running the latest version of Raspbian (now called Raspberry Pi OS). This is the operating system that powers your Pi and makes everything else possible. You can download the latest image from the official Raspberry Pi website and flash it onto an SD card using a tool like Etcher.
Pro tip: Always back up your current setup before making changes. Trust me, you'll thank yourself later if something goes wrong.
Read also:Kelly Ripas Baby Fever The Surprising Truth Behind Her Thoughts On Baby No 4
Step 2: Enable SSH
Even though we're focusing on web-based control, enabling SSH is still a good idea. It gives you an extra layer of access in case something goes wrong with your web setup. To enable SSH, simply create an empty file named "ssh" (without any extension) in the root directory of your SD card.
Once your Pi boots up, SSH will be automatically enabled. Easy peasy, right?
Choosing the Right Software
Now that your Pi is set up, it's time to choose the software that will allow you to control it via web browser. There are several options available, each with its own strengths and weaknesses. Let's take a look at some of the most popular ones:
Option 1: WebIOPi
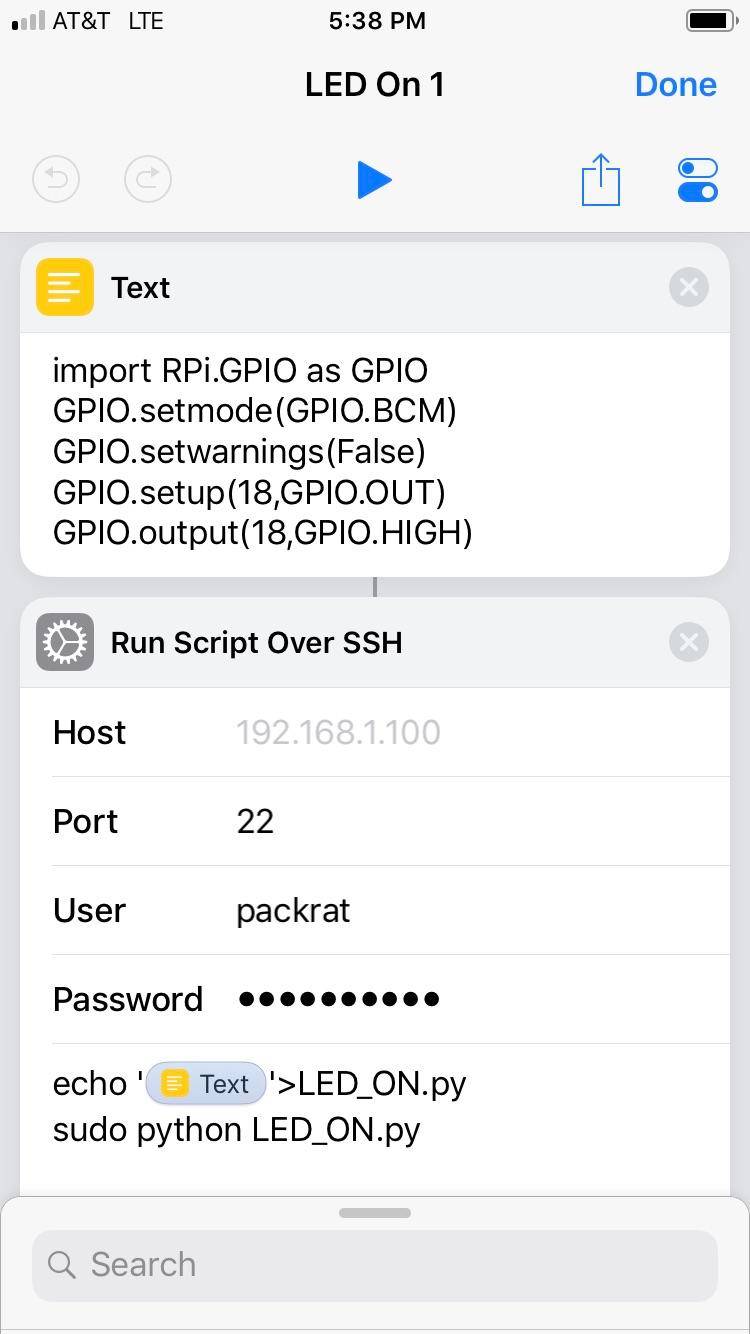
WebIOPi is one of the most user-friendly tools for controlling Raspberry Pi via web browser. It allows you to interact with GPIO pins directly from your browser, making it perfect for projects like home automation or robotics.
To install WebIOPi, open a terminal on your Pi and run the following commands:
- sudo apt-get update
- sudo apt-get install webiopi
Once installed, you can access the WebIOPi interface by navigating to http://[your-pi-ip]:8000 in your browser. Simple, right?
Option 2: Pi Web Agent
Pi Web Agent is another great option if you're looking for a lightweight solution. It allows you to execute commands on your Pi directly from a web interface, making it ideal for scripting and automation tasks.
To install Pi Web Agent, follow these steps:
- Download the latest version from the official GitHub repository.
- Extract the files and run the installation script.
- Access the web interface by navigating to http://[your-pi-ip]:80 in your browser.
Pro tip: Always secure your web interface with a password to prevent unauthorized access.
Securing Your Raspberry Pi
Now that we've covered the basics, let's talk about security. Controlling your Raspberry Pi via web browser opens up a world of possibilities, but it also comes with some risks. If you're not careful, you could leave your Pi vulnerable to hackers or other malicious actors.
Tip 1: Use Strong Passwords
It might sound obvious, but using strong passwords is one of the easiest ways to protect your Pi. Avoid using common words or phrases, and make sure your password is at least 12 characters long. Mixing uppercase and lowercase letters, numbers, and symbols can also help.
Tip 2: Enable Firewall
A firewall is like a digital bouncer—it keeps unwanted traffic out of your Pi. To enable the firewall on your Raspberry Pi, you can use a tool like UFW (Uncomplicated Firewall). Here's how:
- sudo apt-get install ufw
- sudo ufw allow ssh
- sudo ufw enable
Now your Pi is protected from unauthorized access while still allowing SSH traffic.
Advanced Features
Once you've got the basics down, it's time to explore some advanced features that can take your Raspberry Pi projects to the next level. From custom dashboards to real-time data monitoring, the possibilities are endless.
Creating a Custom Dashboard
A custom dashboard is a great way to visualize data from your Raspberry Pi projects. You can use tools like Node-RED or Grafana to create interactive dashboards that display everything from sensor readings to system performance metrics.
Here's how to get started with Node-RED:
- Install Node-RED on your Pi by running sudo apt-get install nodered.
- Launch Node-RED by typing node-red-start in the terminal.
- Access the Node-RED interface by navigating to http://[your-pi-ip]:1880 in your browser.
Now you can start building your dashboard by dragging and dropping nodes onto the canvas.
Real-World Applications
So far, we've covered the technical aspects of controlling Raspberry Pi via web browser. But what about real-world applications? How can this setup be used in everyday life? Let's take a look at a few examples:
Home Automation
One of the most popular uses for Raspberry Pi is home automation. By controlling your Pi via web browser, you can manage everything from lighting to temperature from anywhere in the world. Combine this with smart devices like motion sensors or smart plugs, and you've got a fully automated home.
Remote Monitoring
Another great application is remote monitoring. Whether you're tracking environmental conditions in a greenhouse or monitoring server performance, controlling your Pi via web browser allows you to access real-time data from anywhere.
Troubleshooting Common Issues
Even the best-laid plans can go awry sometimes. If you're having trouble controlling your Raspberry Pi via web browser, don't panic. Here are a few common issues and how to fix them:
Issue 1: Can't Connect to Web Interface
If you can't connect to your Pi's web interface, the first thing to check is your IP address. Make sure you're using the correct address and that your Pi is connected to the network. You can find your Pi's IP address by running the ifconfig command in the terminal.
Issue 2: Slow Performance
Slow performance can be caused by a variety of factors, including network congestion or insufficient resources on your Pi. Try restarting your Pi or optimizing your scripts to see if that helps.
Conclusion
And there you have it—a comprehensive guide to controlling Raspberry Pi via web browser. Whether you're a seasoned pro or just getting started, this setup offers endless possibilities for your projects. From home automation to remote monitoring, the only limit is your imagination.
So what are you waiting for? Grab your Raspberry Pi, follow the steps in this guide, and start exploring the world of web-based control. And don't forget to share your experiences in the comments below—we'd love to hear about your projects!
Table of Contents
- Why Control Raspberry Pi Via Web Browser?
- Setting Up Your Raspberry Pi for Web Control
- Choosing the Right Software
- Securing Your Raspberry Pi
- Advanced Features
- Real-World Applications
- Troubleshooting Common Issues
- Conclusion
Remember, the key to mastering Raspberry Pi is practice and experimentation. So don't be afraid to dive in and try new things. Happy tinkering, and see you in the comments!